Wednesday, July 31, 2013

The Good and the Bad

I'm back!  Sorry that I've been MIA for a while, things have been crazy here...  In both good and bad ways.  

Good: I went to Boston for vacation with my family for 4 days which was wonderful!  I had the greatest time.  If you haven't been, I highly recommend it.  I loved being able to see all of the historic sights (and trust me there are tons!)  

Bad: My wallet was stollen...  This is the worst!  Not 10 minutes after I lost it (at a gas station) someone was trying to use my debit card and credit card to purchase things.  Luckily they did not know my pin number or my zip code so they were not able to make any charges.  But I had to go through the process of canceling the cards and now I've been trying to replace the things that were in my wallet.  And this has been a struggle!!  I finally have a temporary debit card but am still waiting on many other things.  It's been rough to say the least!  On the bright side, it's all replaceable and I wasn't carrying cash.

So that's why I've been absent for a while.  But I'm excited to get back in the swing of things and keep blogging.  

What have you all been up to since I last posted?  Any exciting projects going on?

Monday, July 22, 2013

My Menu Board

Good morning everyone!  Hope you all had a fantastic weekend :)  I spent mine crafting (of course) and babysitting and really enjoyed myself.  And, of course, I spent time working on my next DIY Home Improvement project :)  So what's today's project?  My dinner menu board!


I looked at a lot of menu boards on Pinterest and took ideas from all of them to create exactly what I wanted!  And I had most of the supplies on hand :)  A little while ago my mom sent me a manilla envelope with different papers and such inside.  To keep them from bending she put a piece of cardboard in along with them.  This was perfect for the base of my menu board!  I knew I was going to use clothespins so I didn't need anything magnetic for the base.

I then went to my supply of scrapbook paper (which is really just craft paper for me since I don't scrapbook) to find something that matched the feel of the kitchen.  The colors and flower pattern on this paper was perfect!  Next was to attach the clothespins.


I had these clothespins on hand as well!  Guess where I bought them?  Yup!  Dollar Tree ;)  I super glued the clothespins to the board and found another piece of scrapbook paper to mark the days of the week.  The clothespins are perfect and easy for clipping in dinner options for every night.  Then I needed slips of paper to write the dinner options on.  Well that was the one thing I did not have on hand :/  While I had scrapbook paper that would work I wanted something thicker so it wouldn't flop on the clothespins and would last longer.  Which I meant I needed to go out and buy some card stock.  So I found the perfect color pack of card stock at Walmart for $5.00 :)  I have them color coded so my roommate and I can try to keep a variety of foods for dinner each week rather than having all the same color up on the board.

Blue: Pastabilities (all pasta dishes)
Green: Food in hand (burgers, sandwiches, etc)
Yellow: Meet Dishes
Aqua: Easy Peasy! (dinner out, take out, etc)

That's what I have for now but I still have plenty of card stock so I can add more categories if I need to.

But that's not all!  I need a place to store all of the dinner cards we aren't using each week.


So I made a pocket to store them all :)  My roommate had just made pudding and the box it came in was the perfect size!  So I grabbed another sheet of scrapbook paper, covered the box, and glued it to the menu board.  Easy and perfect :)

I added the Menu title on another piece of scrapbook paper and added stickers that I already had on hand.  I stuck command strips to the back and stuck it to the fridge :)  I love the way it turned out and am really excited to start using it!

Friday, July 19, 2013

Baby Binder: A Year in Photos


I have seen so many adorable baby pictures taken each month to show how much they've grown over their first year and I knew I wanted to include that in the baby binder.  So I've created a two-page layout in the multiple color ways with a space to fit a wallet sized picture for each month of the babies first year.

Aqua and Lime
Cayene and Salmon
Maroon and Carnation

Mocha and Cantaloupe

Ocean and Sky

Moss and Flora

Teal and Cantaloupe

Salmon and Sky


Plum and Lavender


Ready for your free download?

Thursday, July 18, 2013

Children's Aprons

Happy Thursday everyone!  Remember how I told you all I am hoping to start getting in to the craft fair scene?  Well I have received my first application!  I am so excited.  The application is due September 26th which gives me plenty of time to get everything in order.  The application requires a list of every item I plan on selling with accompanying pictures.  So I've been working on creating that list and building up some inventory to photograph.  Here is my latest project:


Aprons for children!  Perfect for cooking up pretend food or helping out in the kitchen.  They are made from kitchen potholders and dish cloths so they are sure to stand up to hours of playing and baking.


The top portions are made from 7"x7" square potholders


The skirt is 15"x12.5" (pleated at the top to match the 7" top)


The ties and neck strap are made from grosgrain ribbon.  The waist tie is 42" end to end and the neck strap is 18" end to end.  And everything is machine stitched.  They are durable and machine washable!

The tops are 100% cotton and the skirts are 100% polyester.

Machine wash cold.  Tumble dry low.  Do not use bleach.  Do not iron.

They are vibrant and fun - any little girl would love to have one!

Want to purchase one for a child in your life?  Please visit my facebook page, etsy page, or e-mail me!  More color and pattern options are available.

Each apron is $10 plus shipping.

Wednesday, July 17, 2013

Kids Crafts: Car Town

Hurray for Wednesday!!  The day dedicated to Kids Crafts :)  So what is our first kids craft?  A town for toy cars of course ;)

The 4-year-old boy that I nanny for LOVES toy cars.  He has about a billion of them in a bin under his bed.  Okay, so maybe a billion is a bit of an exaggeration, but seriously this child as a ton.  And while playing cars on the big table in his room is fun and all, I knew there had to be a way to make it more exciting (maybe more for me than for him! haha).  So I set out to do some research and I found the perfect craft!  Making a town for his cars to play on.

Recent-College-Grad Budget mode kicked in and I set off to the Dollar Store!  I grabbed a shower curtain and was done with supplies for this craft :)  Total Cost: $1.07

When I got to my apartment I grabbed a permanent marker and set to work drawing roads and buildings.  I thought about doing this while I was with him but decided I wanted to let him get straight to work on coloring and playing.


I picked buildings typical of a town and personalized it a bit as well.  I had to add a Chick-Fil-A since we go there at least once a week.

When I brought it over to show him he was so excited!  His sister was in camp that morning so it was just the two of us to decorate and play with the town.


It fit inside but I didn't want him to color on it on the floor so we both decided moving it to the driveway was a better idea :)


He helped me secure the ends down with bricks that were broken off the front porch and he was ready to go!  He said he wanted to color it first but after picking up and breaking the first crayon decided he couldn't wait anymore and just wanted to start playing!  Guess where his car went first?


If you guessed Chick-Fil-A you were right!  He had a blast :)  He told me he didn't want to color it right then because he wanted his sister to be able to help him.  So instead, while he was driving around, he gave me some ideas of other buildings to add to the town (silly me, I forgot to add houses!)  It was great to see him laughing and playing with it.  And he was so excited to show his mom and his sister when they got home :)  He also said he doesn't want to color it all in one day, he wants to be able to color a little bit everyday so he'll have lots of days to color!  He really is adorable.

For a craft that cost me a dollar I am so glad he loved it so much!  What a fun and inexpensive craft for children of all ages :D  I mean come on - who doesn't love a town you can drive your toy cars on??

Tuesday, July 16, 2013

Create-a-Long: DIY Gift Bags

It's Tuesday!  And you know what that means!  Time to start our very first Create-a-Long!  I wanted to start with something that would be quick and easy.  And, with craft fairs on my mind, I picked a craft I can use should I end up making it into a craft fair.  So our very first Create-a-Long will be DIY gift bags :)

We will be starting the project next week!  So, how can you prepare?  By buying materials of course!

What You Will Need:
- 1 roll of paper (brown packing paper, wrapping paper, etc.)
- Adhesive
- Scissors
- Twine or ribbon

You may have some, all, or none of these items on hand.  But you have a week to gather all of your materials together for the project next Tuesday :)

I have all of my materials together and ready!  So here's what I will be using:


Magic (my attention loving cat) wanted to be included in the picture :)  My roommate bought him that shirt a couple days ago and he's not so sure how he feels about it yet

I might end up using tape but forgot to stick that in the picture

Monday, July 15, 2013

Spice Drawer Makeover!

Happy Monday everyone!  I hope you all had a wonderful and crafty weekend.  I know that I did :)  I've also taken the time to re-structure my weekly blogging system!  Hurray :D  Until now I haven't really had a system for figuring out what to blog about.  So for the rest of July I will be testing out a new, weekly schedule.  So here it is:

Monday:  DIY Home Improvement
I have a couple projects lined up on how to spruce up my apartment with DIY projects!  So I will use my weekends to work on some of those and update you all on Mondays with what I did and how I did it.  I'd love to be able to inspire some of you to do the same!

Tuesday:  Create-a-Long
Originally the idea was for a "Knit-a-Long" day but that limits me too much!!  This Tuesday (tomorrow) I will be discussing the very first "Create-a-Long" with all of the details for us to create a project together!  And every Tuesday I will be posting updates with what I have done so far and what my goal is to have completed for the following Tuesday.  Get excited because I know I am!

Wednesday:  Wacky-Wednesday Kids Crafts
One day every week will be dedicated to a different craft just for kids!  I won't be able to include pictures of the children I have completing my crafts (I'll be crafting with the children I babysit and, since they aren't my children, I don't want to post their pictures on the internet).  But I can hopefully get pictures of the crafting process without showing their faces :)

Thursday:  Products for Sale
I do want to keep all of you updated on the items I have available for purchase (both on Facebook and on Etsy).  So I will be dedicating my Thursday posts to a different item each week.  With lots of pictures and information of course :)

Friday:  Free Download
For now this means updates on the baby binder :)  Once the baby binder is complete I'll either have to think up something else or pick a different topic.  So for now a new download for the baby binder will be available every Friday!


So today is Monday!  And that means it's time for a "DIY Home Improvement" post!

I follow a blog here that I am obsessed with!  iHeartOrganizing.  Jen, the author of this blog, is fantastic!  If you haven't checked out her blog you honestly should.  I was checking out her blog the other day and she had a post about a DIY project one of her readers accomplished.  She completely re-organized her spice drawer!  One glance and I fell in love.  I mean this was beautiful!  And I started thinking about my spice drawer.  Spice bottles thrown in a drawer next to my stove which end up rolling around every time it opens and closes.  Not an ideal situation for someone who wants everything to be organized.  So I decided to take on the DIY challenge!

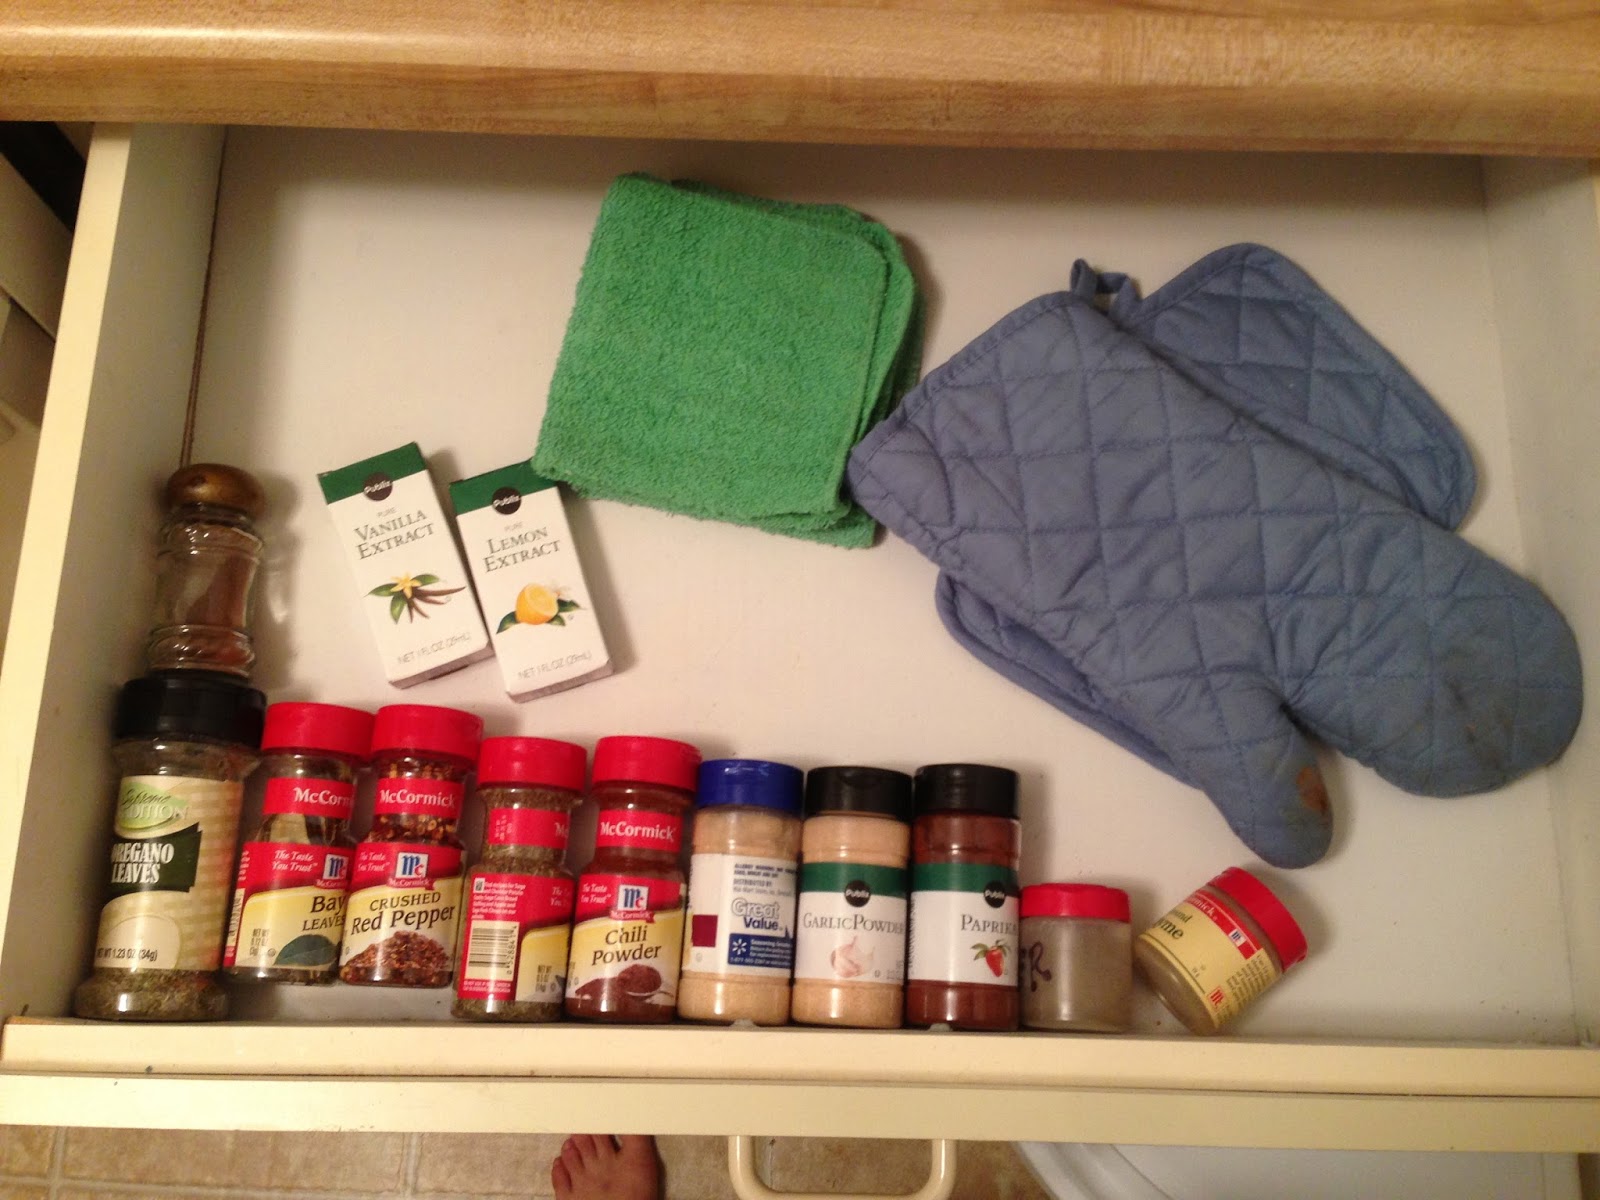
This is what the drawer looked like to begin with:


 I tried to keep the bottles all lined up like this but they would inevitably get all messed up and I'd have to straighten them out again.  Not fun.  So I set out to do a budget friendly, DIY makeover!

I wanted to have a pretty drawer liner to help with small messes and to make the drawer look pretty.  But being on a recent-college-grad budget has me counting every penny I spend.  So I was looking through what I already had on hand and found the perfect solution!


I bought this wrapping paper a few months ago at the dollar store (my favorite place to shop) for a friend's birthday and it's been sitting in my closet since.  There is still plenty of wrapping paper left on the roll and I decided that it would be perfect for my drawer liner!


What do you think?  I love it!  The colors are bright and fun and it just creates a great vibe!  Cost so far: $0.00 (but if you didn't have this on hand you could pick up some wrapping paper for $1.00 at Dollar Tree.)

Then it was time to organize the spices!  I went to Walmart and bought a pack of 12, 8-oz Mason Jars.  They cost me $8.97 ($9.56 with tax).  The jars fit standing up inside the drawer which is perfect!  So I transferred each spice bottle into a different Mason Jar to give them all a unified look.  But when I stuck them in the drawer they still seemed like they would move around a bit (though definitely an improvement from the bottles).  Well the pack of Mason Jars that I bought came with one of those cardboard separators so I put that in the drawer as well!


I could have stopped there but I had the DIY Creative Bug in me and decided I wanted to give the jars a little pop of color as well.  So I grabbed my Post-It Label Pads (a gift from my mom a while back so I already had them on hand) and cut out circles to stick to the tops of the Mason Jars.


What do you think?  Personally I think the DIY Makeover was totally worth it!  And it definitely fit within my budget!

Cost of Materials:
- Wrapping Paper on hand:       $0.00
- 12 pack of Mason Jars:           $9.56
- Post-it Label Pads on hand:    $0.00
TOTAL: $9.56

Wednesday, July 10, 2013

Baby Binder - Family Tree Page

Next up for our baby binder is an adorable Family Tree page!  While the page itself only has lines for parents, grandparents, and great-grandparents, there are blank spaces on the sides of the truck for listing other relatives such as cousins, aunts, uncles, etc.

As with most of the pages for this baby binder there are customizing options!
- Have one or all names written in on the family tree
- Have a list of cousins, aunts, uncles, etc written on the sides of the trunk

Want to see the different color options?  Here you go!
Aqua and Lime
Cayene and Salmon
Maroon and Carnation

Mocha and Cantaloupe


Moss and Flora

Ocean and Sky

Plum and Lavender

Salmon and Sky

Teal and Cantaloupe


I love the funky shaped tree and leaves!  I think it's adorable.

Aqua and Lime
Cayene and Salmon
Maroon and Carnation
Mocha and Cantaloupe
Moss and Flora
Ocean and Sky
Plum and Lavender
Salmon and Sky
Teal and Cantaloupe

Tuesday, July 9, 2013

Baby Binder - Calendar Page

Keeping track the baby's check-up's and other outings is definitely important!  Which is why the next download for the baby binder is a calendar page.  It's pretty self-explanatory but also important.

Of course there are customizing options :D
- Have the name of each month written on the top of the page
- Have the dates written in the calendar
- Have important dates (such as birthday's, anniversaries, etc) written in the calendar

Here is what the calendars look like for the different color options:
Aqua and Lime
Cayene and Salmon

Maroon and Carnation

Mocha and Cantaloupe

Moss and Flora

Ocean and Sky

Plum and Lavender

Salmon and Sky

Teal and Cantaloupe


Which color option have you decided to go with for your baby binder?  Or have you decided to mix and match different colors?

Aqua and Lime
Cayene and Salmon
Maroon and Carnation
Mocha and Cantaloupe
Moss and Flora
Ocean and Sky
Plum and Lavender
Salmon and Sky
Teal and Cantaloupe

Monday, July 8, 2013

Baby Binders - Birth Stats Page

I hope you all had a fantastic 4th of July weekend!  I know I did :D  Which may or may not have something to do with the fact that the 3rd was my birthday.  It really was great!

So has anyone started on their baby binder besides me?  Because I'm definitely excited!  The PDFs will only be available as free downloads for a little while so get them while you can.  After that they will be available for purchase.  So my plan for the binder is to print on something a little thicker than regular printer paper so it will stand up a little nicer.  Then I want to get it bound rather than put it in a binder.

The next download is for birth stats.  The top of the page has a brush stroke perfect for writing the baby's name!

Then there are three stars for birthday info, weight, and height.  It's the perfect page for recording all of the important birthday stats :)

Customize Options:
- Have your baby's name pre-printed on the top of the page
- Have your baby's information pre-filled in the stars

Check out the pages for the different color options!
Cayene and Salmon
Salmon and Sky
Teal and Cantaloupe

Plum and Lavender

Ocean and Sky

Aqua and Lime


Mocha and Cantaloupe
Maroon and Carnation

Moss and Flora


Did you miss the cover page download?  You can find them here!